ShopDreamUp AI ArtDreamUp

Deviation Actions


Description
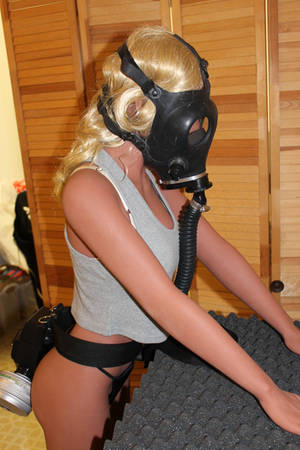
Pyro Mask almost done! ive gotten a little further since these pics. only needs gloss (done after photos) and lens tint.
if you are looking to make one here is what i used:
-standard balloon (blown up and used as a base)
-paper mache (just flower mixed with water + news paper)
-2 fridge storage tin lids (i found these at the dollar store they make great goggle and mask lenses, u will likely need to find another solution for lenses)
-metal sink plug (used for front filter)
-a bolt for the side (i used another one on the front filter to hide an ugly hole)
-empty icing container (used for side filter, just cut off the bottom)
-hot glue (to hold a few things in place)
-black and silver paints (also a clear gloss spray paint ti go over the finished peice)
Heres how:
1. blow up your balloon and place it somewhere sturdy like on top of a cup.
2. mix the paper mache and aply a layer to the entire balloon
3. WAIT for it to dry (do not use a hair dryer just trust me on this) and then add another layer of paper mache (do this for at least 3 layers thick)
4. WAIT AGAIN for it to dry fully! DO NOT pop the balloon unless you are 100% sure that the mache has FULLY dried and is nice and sturdy. now you can pop the balloon (there should be a little hole where the tie of the balloon is, just snip it and allow the air to release slowly, then pull it out)
5. remember that the little hole is going to be where ur mouth filter is. now cut a hole in the mask big enough for your head, and 2 holes where the eye peices will be (make sure to cut them the right size and in the right places!)
6. insert your lenses (try it on and make sure u can see out of them alright) hot glue around the rim a little to hold it in place.
7. break the little plastic part of the sink stopper and remove it, hot glue it to the mask (likely you will only glue it at the top, place a bit of the cut out hard mache to keep the bottom in place. hot glue the screw into the center to hide the hole)
8. cut the bottom off of the icing container and hotglue the top half to the side of the mask.
9. cut a small hole for the bolt on the side and insert it (make sure its not a sharp pointed screw and it has to be rather short as to not stab into your face) hot glue it in place.
10. paper mache around the edges of the lenses and filters, use a referance picture to guide you of teh shape.
11. after its all dry again add the paint (just a tip the front of pyro's mask has "OPTICAL MASK" writen on it. dont ask why im realy not sure, there is also some illegible writing underneath just make a few scribbles for that)
12. once its all dry spray on the gloss finish and in a couple minutes of drying itll be all done!
13. OPTIONAL: you can add fabric to the neck to cover the back of your head better
Image size
1331x769px 253.04 KB
© 2011 - 2024 Feicoon
Comments26
Join the community to add your comment. Already a deviant? Log In
Thank You really Much, This would really help me! 